Power issues#
Important
Please ensure that the Librem EC is updated prior to attempting these troubleshooting steps.
Power / charge LED indicators#
Note
Orange indicators continue to appear for 7 seconds when the system is turned off while unplugged.
Color(s) |
Pattern |
System state |
Battery state |
|---|---|---|---|
White |
Solid |
On |
Not charging (battery full, or not plugged in, etc.) |
White |
Dimming |
Suspended |
Not charging (battery full, or not plugged in, etc.) |
Green |
Solid |
On or off |
Charging |
Green |
Dimming |
Suspended |
Charging |
Orange |
Solid |
On |
Not charging, and either <20% charge or “terminate discharge” is active |
Orange |
Dimming |
Suspended |
Not charging, and either <20% charge or “terminate discharge” is active |
Orange/white |
Blinking |
On |
Not charging, and either <10% charge or “capacity alarm” is active |
Orange |
Blinking and dimming |
Suspended |
Not charging, and either <10% charge or “capacity alarm” is active |
Battery will not charge#
Ensure an AC power adapter (the same model as originally provided with the device) is connected to mains power.
Ensure the device is plugged in to the AC power adapter from the previous step.
- Turn on the device and log in to your account.
- Does the battery state of charge show that it is charging?
YES: Proceed to the next question.
NO: Plug the AC adapter into a different mains outlet and retest. If other devices are able to charge on the same outlet, the current power supply may be faulty. Purchase a new power supply from the shop. Alternatively, contact the Support department (support@puri.sm) with your order number and testing results and await further instructions.
- Does the battery charge percent increase over time?
YES: There appears to be no issue.
NO: Proceed to the next step.
Document which LEDs illuminate (if any).
- Plug the AC power supply into a different socket, measuring the voltage if possible.
- Does the battery charge percent increase over time?
YES: The current power supply appears faulty. Purchase a new power supply from the shop. Alternatively, contact the Support department (support@puri.sm) with your order number and testing results and await further instructions.
NO: Proceed to the next step.
- Try using another charger with the same specifications as the AC power supply originally provided with the device (if one is available).
- Does the battery charge percent increase over time?
YES: The original power supply appears faulty. Either use the AC power supply from this step, or purchase a new power supply from the shop. Alternatively, contact the Support department (support@puri.sm) with your order number and testing results and await further instructions.
NO: Proceed to the next step.
Remove the rear cover.
- If the 3-cell battery is installed, check if 3-cell batteries are supported.

Devices that need the 0-Ohm resistor look like the middle image. Between the battery connector (left) and the M.2 Wi-Fi socket (right), there is a single transistor marked Q37, and there’s no 0-Ohm resistor across the left side leads. You need to install the 0-Ohm there and solder it to the two leads on that side. (Orientation does not matter.)
The left image is a more recent revision. Q37 is not populated; instead R76 is placed across two pads. This device doesn’t need the change. (Note that there is another transistor in a similar location marked Q26 in this revision, don’t confuse it for Q37.)
The right image is a device with the 0-Ohm resistor installed. Either battery can be used, this change has no effect on the 4-cell battery.
- Is a 3-cell battery installed and is it supported?
YES: Proceed to the next step.
NO: Install a 0-Ohm resistor bridge on the Q37 transistor. If you are not comfortable with soldering, please contact our Support department (support@puri.sm).
Disconnect the battery connector and leave the device idle for 6 hours.
Connect the battery connector.
- Turn on the device and log in to your account.
- Does the battery charge percent increase over time?
YES: The battery appears faulty. Purchase a new battery. Alternatively, continue to the next step.
NO: Proceed to the next step.
Contact the Support department (support@puri.sm). Provide them your order number and testing details and request an RMA.
Device will not power on#
Problem: Pressing the power button on the Librem 14 has no effect.
Diagnostic:
Ensure an AC power adapter (the same model as originally provided with the device) is connected to mains power.
- Ensure the device is plugged in to the AC power adapter from the previous step.
- Does the device power on when the power button is pressed?
YES: There appears to be no issue.
NO: Proceed to the next step.
Document which LEDs illuminate (if any).
Document whether the fan spins up when you press the power button.
Remove AC power.
- Press and hold the power button for 10 seconds.
- Does the device power on?
YES: The current power supply appears faulty. Purchase a new power supply from the shop. Alternatively, contact the Support department (support@puri.sm) with your order number and testing results and await further instructions.
NO: Proceed to the next step.
Attach AC power.
- Press and hold the power button for 10 seconds.
- Does the device power on?
YES: Finished.
NO: Proceed to the next step.
Remove the rear cover.
Disconnect the battery connector.
Reattach the rear cover (no need to screw it down).
- With no AC power applied, press and hold the power button for 10 seconds.
- Does the device power on?
YES: Screw down the rear cover. Contact the Support department (support@puri.sm). Provide them your testing details and await further instructions.
NO: Proceed to the next step.
Remove the rear cover.
Remove and reinsert the RAM module.
- Ensure that the module is fully inserted and that the clips have fully seated.
- Does the device power on?
YES: Screw down the rear cover. Finished.
NO: Proceed to the next step.
Contact the Support department (support@puri.sm). Provide them your order number and testing details and request an RMA.
Laptop has not been unused for a long time or been excessively discharged#
It can be normal for the battery’s estimated charge to lose accuracy after long periods of storage. There is a very slow unavoidable drain on the battery when stored for a long time, and the battery’s charge counter may not be able to measure it accurately. After a full charge-discharge cycle, the battery’s charge counter will recalibrate. Deeply-discharged batteries may take much longer than normal to start to register a charge percentage again, which is expected.
Please try these steps to recharge the battery and recalibrate the charge counter:
Ensure the device is powered off.
Plug in the original AC adapter.
Ensure the charge indicator light turns green, and let the laptop charge the battery for at least 8 hours. (It usually takes less time than this, but we want to ensure there is sufficient charge to power on the laptop.)
Unplug the AC adapter and turn on the laptop.
Check the state of charge. If the charge level is at least 1%, plug in the AC adapter again and let the battery charge to 100%.
If it is already above 90%, the default EC settings will not start another charge to avoid wearing out the battery with short charge cycles. Proceed to the next step.
If it is still at 0%, stop here and let us know. This is most likely an issue with the battery but could rarely be a mainboard or firmware issue.
When the battery is charged, unplug the AC adapter again.
Leave the laptop on until the battery reaches 5% or below. PureOS will shut down automatically by default when the battery is low. (Avoid running below 1% to reduce wear on the battery.)
Plug in the AC adapter to charge again.
Connecting USB-C while the system is off does not initiate charging#
Problem:
Librem 14 v1-01: Some mainboards do not start charging automatically if USB-C is plugged in while the system is off.
Note
Librem 14 v1-01: Some mainboards contain a footprint for R839 but the component was not populated. These should power on from USB-C correctly.
Librem 14 v1-02: These mainboards replaced R839 with a Zener diode to precisely meet the input requirements of U47.
The problem relates to U47, a 3.3 V regulator that temporarily supplies the USB-C port controller from the power supply’s initial 5 V output. The R835-R839 voltage divider doesn’t rise high enough to turn on U47 from the initial 5 V supply. Tapping the power key briefly powers the USB-C port controller from the system battery, and it quickly enables 20 V output from the power supply. Replacing R839 with a 3.3 V Zener diode allows U47 to operate, enabling the USB-C port controller and allowing the system to charge.
Solution:
As a workaround, tap the power key to initiate the EC. (You do not need to hold the power key to turn on the system; a quick tap is sufficient.)
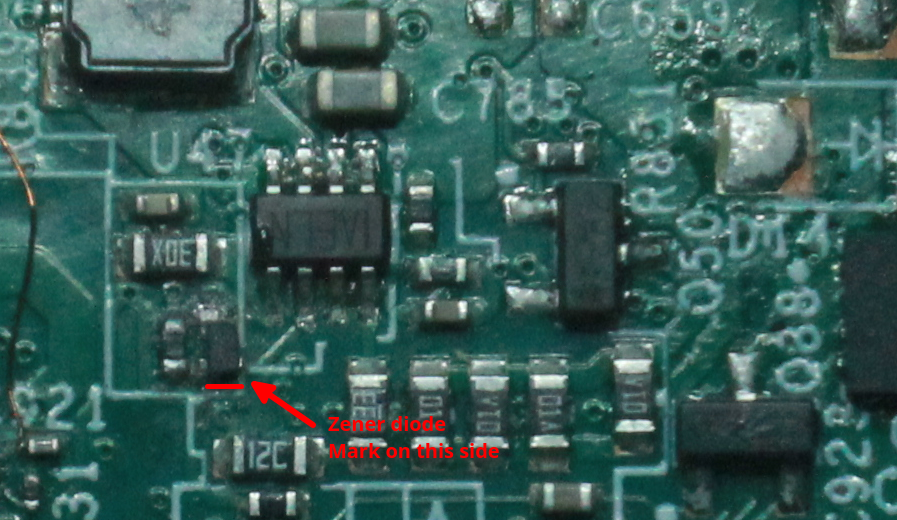
Replace R839 with an 0402 3.3 V Zener diode, such as BZT52C3V3LP-7, to correct the issue:
Locate R839 and remove it
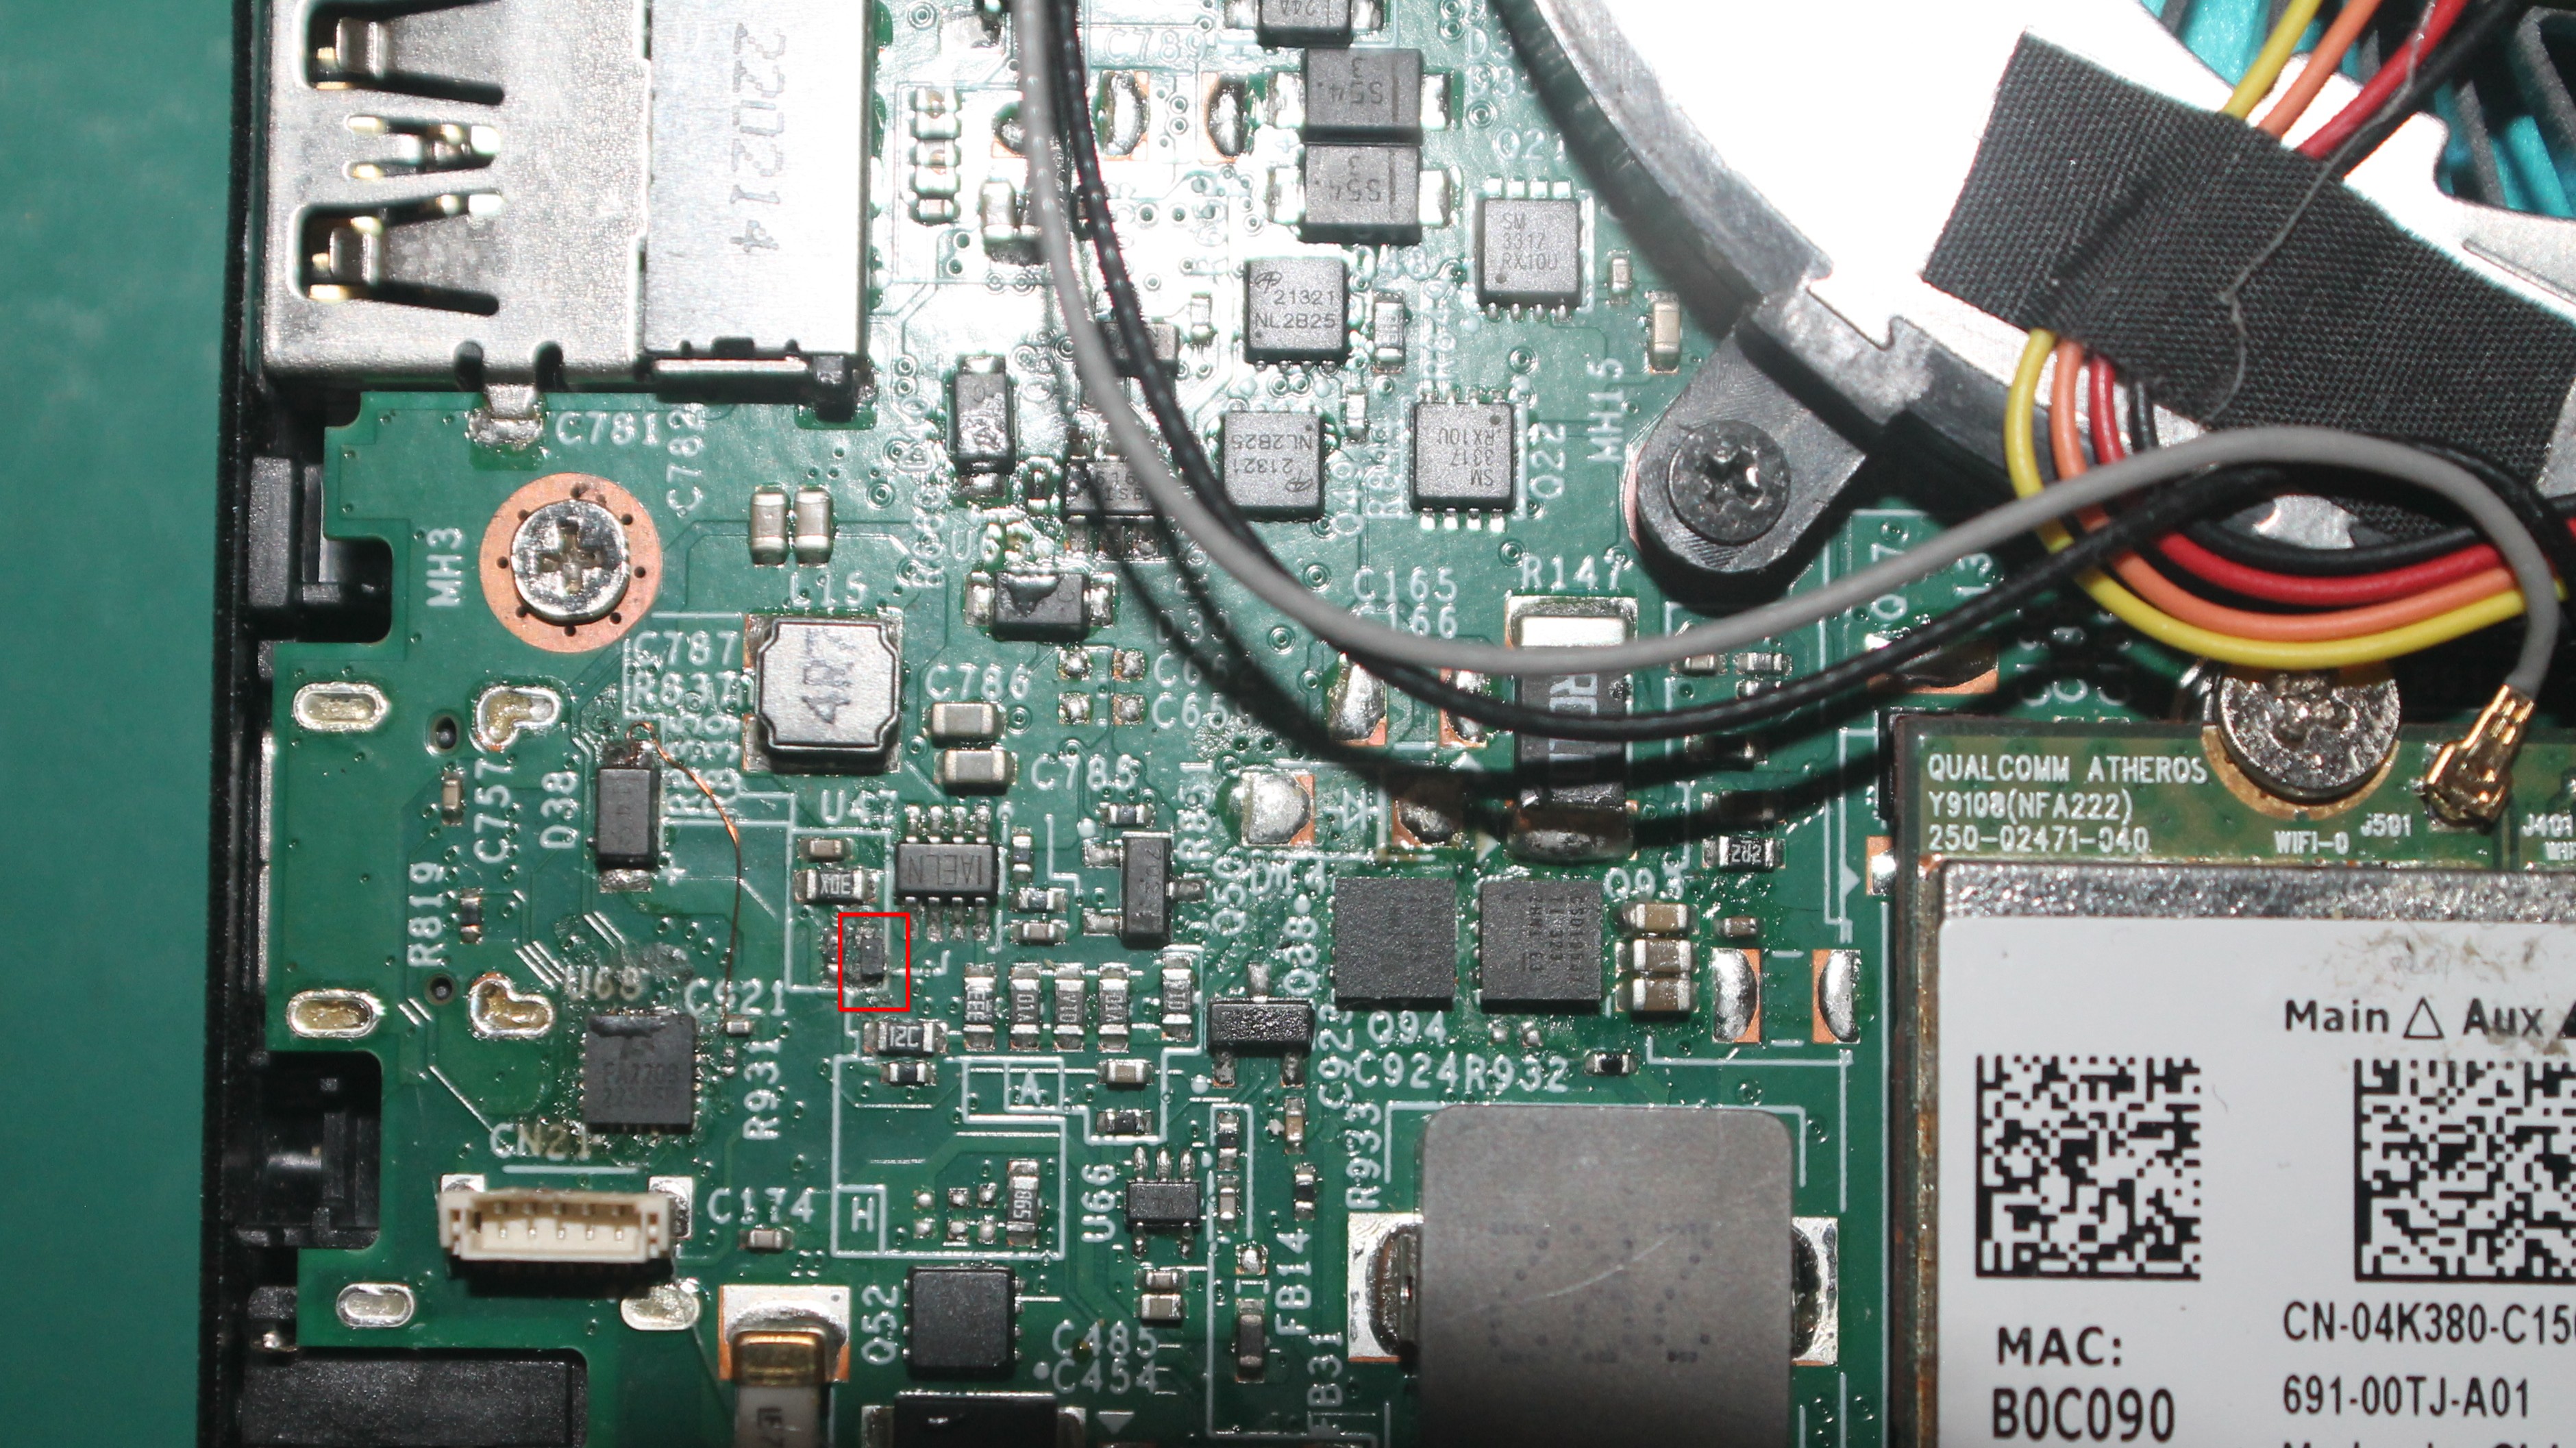
Install an 0402 3.3 V Zener diode. Place the diode with the cathode mark down, away from U47. (The cathode mark is a small dot or line. It is not visible in this photo.)
Battery drains while the system is off#
Problem:
The battery drains while the system is off.
The OS crashes.
There are keyboard issues such as different keycode inputs being transmitted for different keys (i.e. pressing → and it acting as if the Enter key is pressed).
Solution:
Cover the “silver domes” with non-conductive tape.
The “silver domes” can be accessed by removing the mainboard. It will be found under the mainboard and on the chassis.
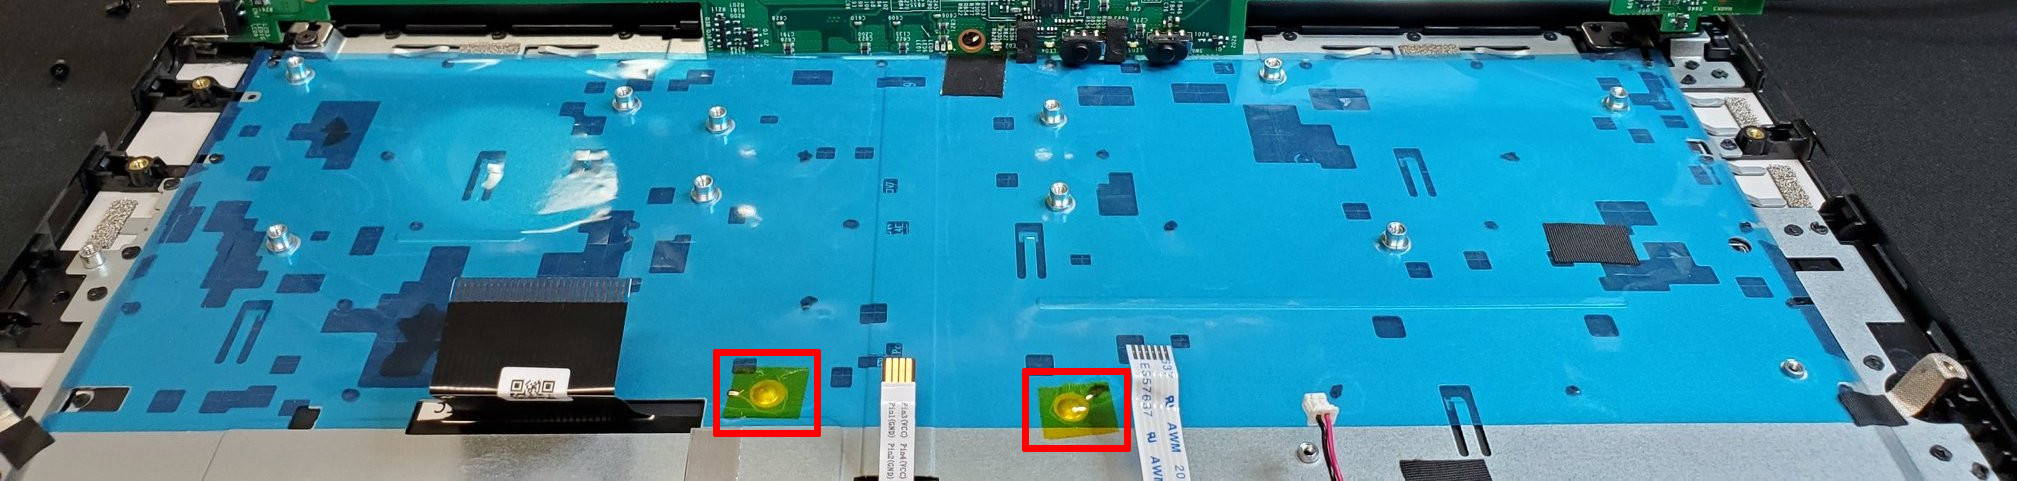
The tape used in the picture is Kapton tape, designed for high temperature resistance and electrical insulation.